"Mops & Ollie" water and shaving cream FX


Mops & Ollie, directed & animated by Christian Kuntz,
Profile Pictures © 2013.  Used by permission.

Hand-drawn FX animation I created for a short film from Denmark.
TVPaint.

2D Screen Wipes: Tsunami Wave & Dust


Bauhaus Mirage.
Curriculum development for AnimSchool.com, an online animation school founded by Dave Gallagher, a former colleague at Blue Sky Studios.

Bulldog Drool: "Rio" (2011)


Copyright Blue Sky Studios.

The directors wanted a lot of sloppy drool coming from George the bulldog. I designed this effect to reflect the same visual qualities found in classic 2D, with plenty of handles for animators to tweak. It employs a modular array of spheres to build shape and is entirely procedural, i.e. non-dynamic.

The primary components are:

1) The drool lining the lips. A series of randomly scaled spheres is created to line the lips, as well as to mesh into the hanging strands, thereby diminishing the appearance of being "tacked-on".

2) The drool strands hanging from the mouth. Their position on the lips and default scale was decided during initial testing. They are positioned procedurally & follow the anchor point, stretching and wobbling in time according to user-defined handles.

3) Droplets being cast from the strands. The user defines which strand casts droplets & when the event should occur. An expression then calculates a velocity vector for the end of the strand at that particular frame, creates a ballistic trajectory and emits the droplet(s) accordingly. If the procedural result is deemed undesirable, the velocity vector can be overridden and assigned manually. Because the effect is completely non-dynamic, the user can step in reverse, "flipping & rolling" with repeatable results. The timing of the droplet event can be changed via slideable values in the Channel Editor and the velocity vector will be recalculated on the fly.

The video is composed of 3 sections:
1) Initial tests
2) Production shots - test renders
3) Final frames

I executed several of the shots personally- Otherwise, I supervised and supported the effect across the department. Many of the shots were executed by Jamie Lloyd.

Shoreline Waves: "Rio" (2011)


Copyright Blue Sky Studios.

Every so often an assignment comes along for which great effort is expended in development, but which ultimately gets cut or drastically reduced in the final film. The shoreline on the beach in Rio is such an assignment.

It is tempting to develop an effect like this beyond what is required to complete the shot work, because these types of "pure FX" assignments are very appealing. However, as with any effect, the ability to discern what is important and what can be discarded is most valuable to directors and producers.

This particular wave was an exercise in economy, due to a couple of factors:
1) The directors desired something ambient and unobtrusive.
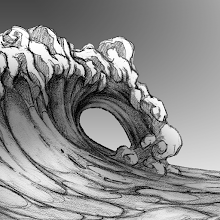
2) FX was grappling with a problem in which renders would fail if the wave doubled over onto itself even slightly (i.e., a curling wave).  Resolution of the render issue would require a major effort from the R&D department.

Because the directors desired simplicity, we deemed it appropriate to accept the render limitation and abandon the development of "breaking" action into the rig.  Hence, the wave always crests into a vertical wall but never quite forms into a curl, instead dissipating and spilling onto the shore.

The wave is composed of a series of 2-dimensional "ribs" lofted together, very similar to the "Robots" domino wave. The surface animates cyclically, expanding and contracting as ocean waves do. The cycle at the shoreline is much slower than that at the source, serving to conceal the cycle without incurring more complexity.

Alen Lai did a lot of great work with the materials, as well as providing a method by which to stitch the animating patch onto the ocean behind it seamlessly.

This clip chronicles the development of the wave. At the end are 3 shots in which the wave appears, albeit briefly.

Non-Dynamic Impact Splash


The splash technique in past films used particle dynamics to generate complexity. With modern RAM & processing power it is now possible to create fairly complex splashes completely non-dynamically. In Maya, each point is driven by an expression. In Houdini, the SOP uses noise to simplify certain randomizations.

Dust, Feathers & Confetti Previs: "Rio" (2011)


Copyright Blue Sky Studios.

Bauhaus Mirage.
One thing I love about being in animation is that it affords me the opportunity to research and learn about things which I would otherwise never encounter in my daily routine.....like tropical birds. Apparently, cockatoos shed a good bit of "waxy" dust - feather bits, dead cells, etc. The first test was to visualize that effect as well as to establish motion for falling feathers.

The second test, a festive confetti logo, was previs for a teaser.

Below is a series of stills of the dust effect. Click for a larger version:

Tar & Lava Bursting Bubbles: "Ice Age: Dawn of the Dinosaurs" (2009)


Copyright Blue Sky Studios.

This effect is a modification of the fluid splash rig used in previous films. A plugin is added to "interrupt and freeze" the ballistic motion in order to direct the individual points to form an expanding semisphere before the bursting event. At burst time, each horizontal row collapses in cascading fashion, and each point within resumes its ballistic motion. The timing of the burst event, the "build up" time leading to the event, and the force & direction of the burst are all available to the animator in the channel editor via slideable channels.

Creating the bursting bubble was only the first part of the equation. It then became necessary to devise a scheme to populate the surface with burst instances. To that end I created a script which procedurally builds a library of bursting bubbles of various scales & forces. The surface patch was then populated randomly from items in the library and the result could be edited by the user if desired. To wrap things up, I wrote a script to automatically create an animating materials signal for each event, essentially an extruded cocoon around the pre-bursted semisphere.

This clip first displays some of the many renders that were created during testing of the burst, then continues with working progressions of 2 of the tarpit shots- standins, bare geometry, playblast, render & final. Next is a small clip demonstrating the procedural random placement, scale & forces applied to the surface patch, followed by working progressions of a few of the lava shots.

Lava Splashes: "Ice Age: Dawn of the Dinosaurs" (2009)


Copyright Blue Sky Studios.

Lava splashes for "Ice Age: Dawn of the Dinosaurs" employed the same splash technique used in previous films. However, the splashes were now created to appear more viscous; utilizing fewer, larger particles than would have been used for water splashes. Whereas in past films dynamic simulation was always applied, some splashes here are composed entirely of spheres driven by expressions. Considerable work was performed in materials to give the particles the appearance of lava, and there was a good deal of back-and-forth between the departments while the shots were being executed.

The clip begins with final frames. The 2 large splashes and the following downshot were executed by Chris Chapman. The 2 geyser shots were executed by Elvira Pinkhas. Following the final frames are test renders of the shots in progress.

Fluid Bubbles: "Ice Age: Dawn of the Dinosaurs" (2009)


Copyright Blue Sky Studios.

The technique is essentially the same as that created for "Ice Age: The Meltdown". With few exceptions, the bubbles are used pretty much out of the box. I executed several of the shots myself. Otherwise, I supervised and supported the effect across the department.

This clip shows a couple of bubble development tests, then final frames followed by test renders.

Water FX: "Ice Age: Dawn of the Dinosaurs" (2009)


Copyright Blue Sky Studios.

A clip displaying water splash and drip FX from "Ice Age: Dawn of the Dinosaurs". The dinosaur splashes were created by Dan Chaika, using the same technique used in previous films.

The drip shots employ the same technique as that used for the opening shot of "Horton".

In hardware render, Buck emerging from the water looks a bit odd, like worms are creeping down his face. However, it was built with clear materials in mind; and once applied, only the motion is perceptible. It was therefore not necessary to finesse the effect beyond basic teardrop shapes.

The final shot is a hero drip on the acorn, with "macro" surface tension & much more subtle nuances applied.

2D Shadow Monster: "Surviving Sid" (2008)


Copyright Blue Sky Studios.

Bauhaus Mirage.
I created this character and designed a scheme to project it onto the 3D rock behind Sid. I also did the animation, breakdown & inbetween work.

Below are still poses and images illustrating the use of the grid:

Leaf & Droplet, Opening Sequence: "Horton" (2008)


Copyright Blue Sky Studios.

The film opens with special FX; a rarity...and an exciting idea. I was cast the first 3 shots of the film.

Shot 1:
This effect is a modification of the icicle drips & droplets created for "Ice Age: The Meltdown". I animated the leaf and created the hero droplets. Because it is a macro shot, "tension" was added to the water beads via deformations of both rotation and scale of the individual spheres, cycling perpetually at varying amplitudes. The lead droplets follow motion paths constrained to the leaf. The deformations occur procedurally via expressions. The mist & incidental leaf droplets were created by Jamie Kirschenbaum. The glint was a masterful touch added by Dan Cayer in Compositing after the shot left the FX department.

Shot 2:
A simple collection of hand-animated spheres, meshed.

Shot 3:
A hybrid of hand-animated spheres and the splash rig from "Ice Age: The Meltdown".

The clip shows the working progression of the effect from conception to final frames.

Water Splashes: "Horton" (2008)


Copyright Blue Sky Studios.

When development was ramping up for "Horton", I spent time developing stylized splashes a la Dr. Seuss. Ultimately, that development was scrapped in favor of the same basic splash rig employed previously for "Ice Age: The Meltdown". Shown here are several of the stylization experiments, followed by final frames, then test renders, some displaying shot progression.

Snow Chunks & Powder: "Horton" (2008)


Copyright Blue Sky Studios.

This effect is a modification of the ballistic trajectory-based fluid splash rig created for "Ice Age: The Meltdown".

I designed and supervised the modeling of five separate snow chunks, each with a precise scale of <<1, 1, 1>>. They were then instanced randomly to individual ballistic trajectory events.  Each chunk instance was scaled disproportionately and randomly.  As with the fluid splash rig, the start frame, scale, speed, rotation & direction are controlled by slideable values in Maya's Channel Editor; no keyframes. The powder is simple surface emission from the models themselves, with a bit of turbulence added.

I worked with Hugo Ayala in R&D to develop a method for stopping the chunks at the surface. When a chunk intersects the surface, it stays in place but continues rotating for 2 additional frames. That was sufficient to eliminate any unnatural stiffness at collision time.

I executed several shots myself. Otherwise I supervised and supported the effect throughout the entire sequence. This clip starts with a demo of the models and 3 short initial tests, followed by final frames & test renders.

Below is a photo I took in my driveway. The snow chunk models were loosely based on these:

2D Previs: "Horton" (2008)

Copyright Blue Sky Studios.

Bauhaus Mirage.
A clip showing various FX previs projects: sound wave, Vlad breath, hairy family cycle, popcorn burst, snow, leaves, smoke & beveled ripple.

Siggraph: "Directable Simulation of Stylized Splash Effects in 3D Space"

This is the Fuild Splash Rig demo I presented at Siggraph in Boston MA, August 3, 2006. It demonstrates how the interactive character splashes were developed & executed for "Ice Age: The Meltdown" (2006). I received much positive feedback from this short clip:


Here is the entire Powerpoint movie (~12 minutes):


A still of CG splash images from the presentation:

Small 2D Splashes


Bauhaus Mirage.
A couple of little splashes created for my presentation at Siggraph in Boston, 2006

Fluid Splashes: "Ice Age: The Meltdown" (2006)


Copyright Blue Sky Studios.

I developed the technique, shape and motion of interactive character splashes in "Ice Age: The Meltdown". Hugo Ayala developed the particle mesher. I executed several of these shots. Dan Chaika executed many of the hero shots. Otherwise, I supervised and supported the effect across the department, including managing many of the temp hires. Several character animators were also drafted for shot work; I supervised & supported them as well.

RealFlow was used for other water FX in the film.

Fluid Bubbles: "Ice Age: The Meltdown" (2006)


Copyright Blue Sky Studios.

I developed the technique, shape and motion of fluid bubbles in "Ice Age: The Meltdown". Hugo Ayala developed the particle mesher. I executed many of these shots. Otherwise, I supervised and supported the effect across the department, including managing many of the temp hires.

This clip displays development tests, final frames, and test renders.

Bubbles Under Ice: "Ice Age: The Meltdown" (2006)


Copyright Blue Sky Studios.

Though motion paths were utilized, this effect is mostly hand-animated and hand-deformed. The actual shots which made it to film was executed by Stephen Unterfranz.

Drips & Droplets: "Ice Age: The Meltdown" (2006)


Copyright Blue Sky Studios.

A clip showing the working progression of the effect from conception to final frames.

Flame FX: "Ice Age" The Meltdown" (2006)


Copyright Blue Sky Studios.

I developed the technique, shape and motion of fire FX in "Ice Age: The Meltdown", supervising and supporting the effect across the department, including managing many of the temp hires. As with all fire FX, lighting and materials play a large part in successful implementation. Alen Lai did a lot of great work in that regard. He executed the campfire shots as well, adding the smoke displayed in the final frames.

This clip displays development tests, then working progressions of several shots.

Domino Waves: "Robots" (2005)


Copyright Blue Sky Studios.

A clip showing the working progression of the effect from conception to final frames.

The wave is composed of a series of modular "ribs" lofted together. Each rib is a NURBS curve. The control vertices of the curve were hand-animated to create the 2-dimensional profile of a curling and crashing wave. Each curve was then duplicated, offset in space and given independent control for scale as well as timing (via a +/-/average node connected to time). Top level handles were added to allow the user to slide timing and scale for each rib & for the wave as a whole. Thus, a simple, poseable, animator-friendly 3D wave was produced.

Grinder Explosion: "Robots" (2005)


Copyright Blue Sky Studios.

I originally conceived a method for volumizing 2-dimensional licks of flame, as demonstrated in the first couple of tests. After experimenting with larger explosions, the effect was scaled down considerably before making it to film.

One-Offs & Miscellany: "Robots" (2005)


Copyright Blue Sky Studios.

This clip features effects in "Robots" for which little development was allocated. Much of what was accomplished here became seeds for further development. I find it necessary to hand-build and hand-keyframe an effect several times as proof-of-concept before building it procedurally. This is the method by which to become intimately familiar with its subtleties; much like painting a portrait familiarizes one better with the subject's likeness by forcing conscious examination of every subtle feature.

The pots were animated outside of the FX department. The suds surface is brute-force manual keyframing of control vertices on the patch. While it seems daunting, it is actually quite manageable with proper organization. Bubbles were created by Clay Budin.

The junk pile through which the saw blade crashes is the same technique - manual keyframing of CVs.

The oil spatter is composed of hand-keyframed spheres. FX was given an sketch of how the spatter should appear in the final frame. From that drawing I simply worked in reverse; essentially "outcome-based" animation.

The junk being dumped from the bucket is hand-keyframed. I emulated curling steam by emitting constantly from underlying hidden rotating geometry. It is an effective illusion (and very cheap).

Finally, the oil dripping onto Mr. Gunk's chest is hand-keyframed spheres, like the above oil spatter.

Shang Breaks Pots


Copyright Walt Disney Feature Animation.

CG Maya 4.0 training, 2003.

A deceptively complex animation and FX exercise. 3D elements over a 2D image plane.

The baton and ghost whooshes were hand keyframed. To place the 3D baton securely in the 2D hands without "floating" required great precision. The focal length of the camera had to be optimized beforehand to maximize the baton's impact when it is thrust into the camera. The bends are nonlinear deformers parented to the baton.

The pot screen-left was hand-shattered via projection curves. Each piece was then extruded, trimmed and hand-keyframed for 4 to 6 frames past impact, with careful consideration given to avoid interpenetration. The pieces were then converted to rigid bodies and allowed to fall and settle. As is usually the case, the rigid simulation yielded a mix of favorable & unfavorable results. The simulation was baked & the offending animation curves adjusted in the Graph Editor. In some cases a simple pivot adjustment & world rotation of the offending piece's god node did the trick.

The dust from the shattered pot & its pieces was simple surface emission from the pieces themselves.

The bucket screen-right was hand deformed via pushing/pulling control vertices, hand keyframed to 4 frames beyond impact and converted to a rigid sim like the shattered pot. I deemed the result of the rigid sim favorable; as such, little alteration was required post-baking.

Car Drives Down Hill, Through Leaves


Copyright Walt Disney Feature Animation.

CG Maya 4.0 training, 2003.

An interesting animation & FX exercise - 3D elements over a 2D image plane for "My Peoples". There are no cues in 3D to determine where & how the car should be placed- only the topography & perspective implied in the layout.

The car and it's various parts (suspension, etc) were animated by hand in the Graph Editor.

The black & white exhaust & road dust are simple dynamics. For the gravel particles, I constructed a hill in 3D for collisions.

In the last test, the leaves on the road were instances populated selectively via Paint FX; dynamic forces were applied to those instances as car drives by.

Hand-Keyframed Props


Copyright Walt Disney Feature Animation.

CG Maya 4.0 training, 2003.

Ball, cup & saucer hand-keyframed in Graph Editor.

Such props in the hands of capable animators can develop interesting character via subtle eccentricities- the animator's signature- which rigid simulation cannot produce.

To develop a strong, innate understanding of something's essence & timing, it is necessary to trudge through it a few times manually, either by drawing in 2D or hand-keyframing in 3D. It can then be exploited and caricatured.

Mulan's cup, saucer and tea are also hand-keyframed. The tea surface is a simple rotating disc. Steam particles are emitted from that disc.

"Brother Bear" (2003)


Copyright Walt Disney Feature Animation.

Final frames followed by pencil tests.

Below is a montage of stills from the clip; pencil tests and final frames:

"Lilo & Stitch" (2002)


Copyright Walt Disney Feature Animation.

Final frames followed by pencil tests.

"John Henry" (2000)


Copyright Walt Disney Feature Animation.

This film was unique in that the style dictated the use of sketchy, broken line work, with obvious construction; a complete reversal of the tight, clean line that characterized most Disney films from the 1990's "Renaissance".

In this clip, I animated everything but the human characters. The clip shows final frames, followed by pencil tests.

Semi-related: To anyone from the MTV generation of the 1980's- remember that cool, animated, sketchy A-Ha video???

Munitions Cart Fire FX: "Mulan" (1998)


Copyright Walt Disney Feature Animation.

This was an FX-heavy sequence. I modeled the cart in Alias, working back-and-forth with the director from hand-drawn model sheets. It is of interest to note that the model was built to satisfy drawing, not lighting requirements. The texture of the mesh on the sides contains tiny extruded curves which emulate line drawing for the puropse of integrating into the hand-drawn environment. The cart was rigged for motion outside of the FX department.

Aside from the cart, I created the fire & smoke FX for these shots, as well as incidentals such as snowprints, animating the rigged cart and flaming arrows.

There is smoke trailing each arrow. For this effect I created several animations to be used as sprites. Those sprite sequences were then placed randomly behind each arrow.

This clip illustrates a test of the rigged cart, final frames and pencil tests.

Below is an montage of stills from the sequence:


It was during this assignment that I observed that fire is nothing more than fresh, hot smoke; that smoke is essentially old, cold fire whose energy has dissipated; and as such, smoke, which encompasses more of the "totality" of the effect, should be animated first and fire second, as an accent. This was a revelation, a trick which made fire more simple to understand.

One-Offs & Miscellany: "Mulan" (1998)

Copyright Walt Disney Feature Animation.